The StackViewer
The StackViewer is the full-screen tool for looking at stacks.
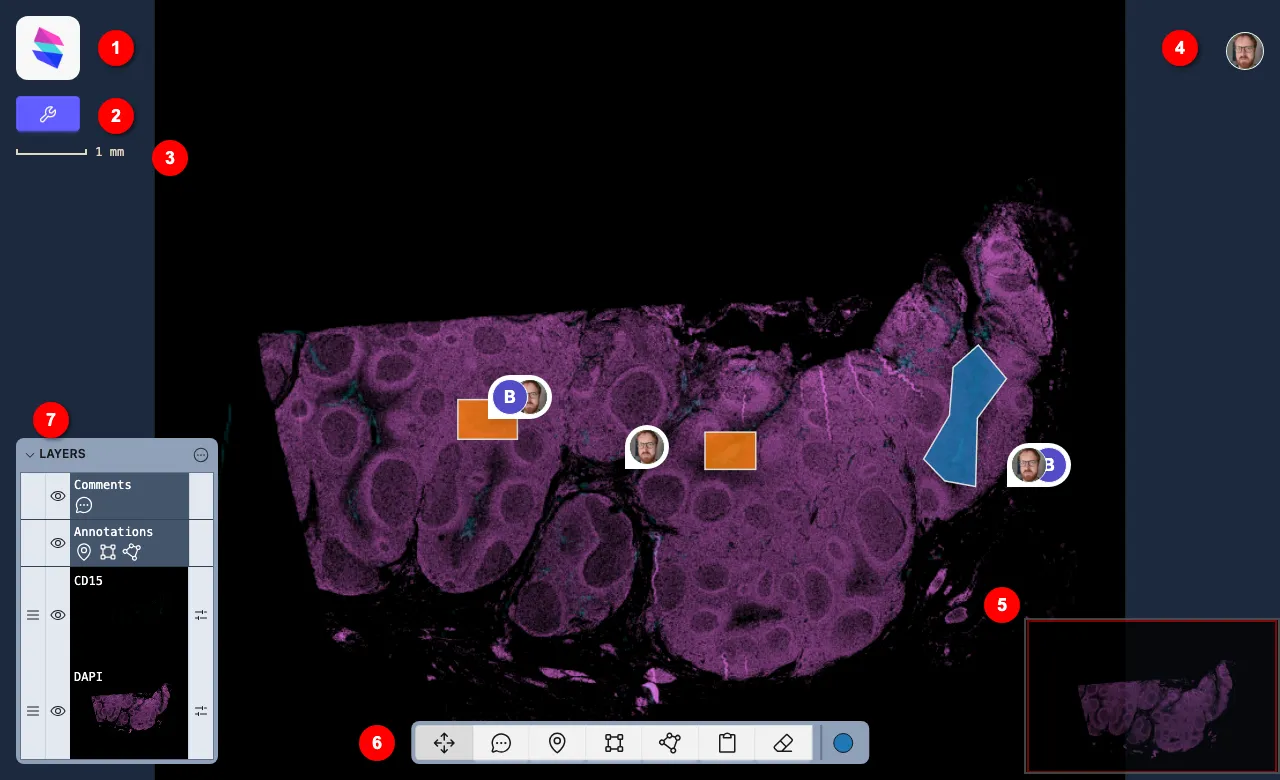
It has a number of operational components, numbered in the above diagram.
1. Breadcrumbs
Section titled “1. Breadcrumbs”The Sundog logo hides the breadcrumb trail; hover over to reveal it. If the breadcrumbs are cropped by the white box, you can scroll the box (vertically or horizontally, it doesn’t matter) to reveal them.
2. Stack Manager
Section titled “2. Stack Manager”Clicking this button will reveal the Stack Manager. The Stack Manager dialog has a number of tabs:
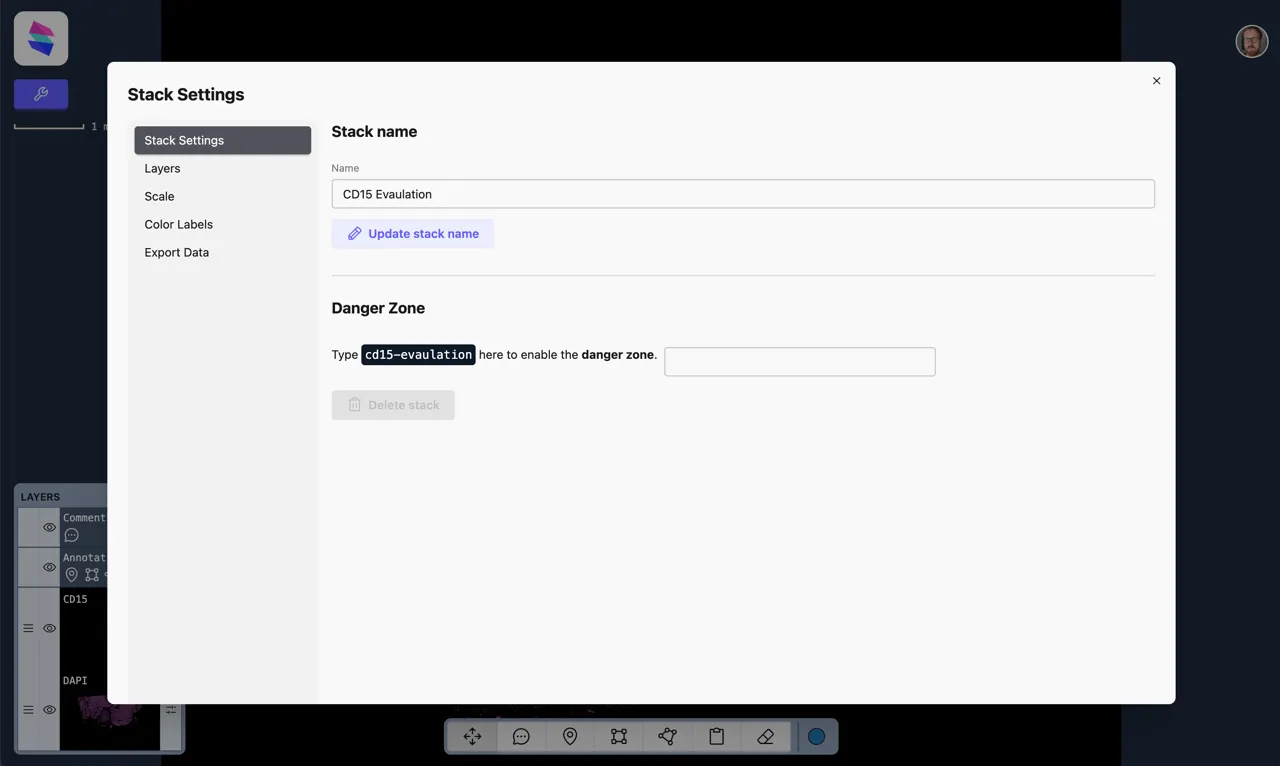
- Stack Settings allows you to edit the Stack’s name, or delete the Stack entirely
- Layers allows you to remove existing layers from the stack, and add other layers from the experiment to it. Only upload pages from of identical dimensions to those in the stack (and from the same experiment) will be shown to pick from.
- Scale allows you to set or edit the scale of the stack, in px/mm.
- Color Labels allows you to give a name to any of the ten colors that can be used for annotations. These names will only apply to this particular stack. The names will appear in the color picker (see below), will appear in the Annotation Inspector, and be included in export data.
- Export Data allows you to export annotations geometry or comments data as CSV/JSON. This will include co-ordinates in the original co-ordinate space of the image, as well as ids of which user made the comment/annotation, and (in the case of annotations) their area in pixels, which number color they are, and (if that color has a label) their label as text. It’s also possible to export a PNG of your annotations, at the original scale of the image.
3. Scale
Section titled “3. Scale”The scale updates dynamically as you zoom the Stack.
Initially, the scale is set to the highest-specicfied resolution in the Stack’s layers. You can alter this in the Stack Manager.
Sometimes, a scale cannot be determined from the layers, and so the scale will be appear grayed out, with the text Unknown Scale!. Clicking the scale or text will open the Stack Manager on the scale tab, and allow you to set it.
4. You and other users
Section titled “4. You and other users”The top-right of the Stack Viewer shows you who is currently looking at this stack.
You are always furthest right, and just like Sundog, clicking your own avatar reveals the main menu.
The avatars of any other users currently looking at this Stack will appear next to yours. Hover over them to see their name.
Follow user
Section titled “Follow user”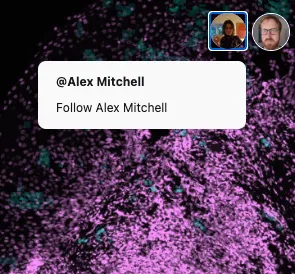
Clicking on another user viewing the stack will give you the option to follow them.
When you follow a user, you’ll see exactly what they see: your screen will pan and zoom in sync with theirs.
Whilst following, you won’t be able to annotate or draw on the image.
To stop following a user, click the large button that appears top-centre, or pick a drawing tool from the Toolbox.
5. Navigator
Section titled “5. Navigator”The navigator shows the totality of the image you’re looking at, regardless of the zoom level. Click or drag it to quickly navigate the image. It hides while your mouse cursor is still.
6. Toolbar
Section titled “6. Toolbar”The toolbar contains controls for working with the stack. All the tools apart from clipboard are sticky - after clicking on a tool you will stay in that mode until you select another non-clipboard tool, or press esc.
From left to right, the toolbar is:
- arrows - Navigate the image. Drag to navigate the image; use mousewheel or two-finger scroll to zoom in/out of the image. While in arrow mode, you can click to select an annotation, or click a comment thread to open it. Note that you only manipulate (edit/delete) annotations you have made yourself. Shift click an annotation to reveal the edit handles
- comments - make a comment. Click anywhere to start a new comment thread; once you’ve added a first comment in the thread, other people will be able to expand it to reply. Find out more about comments in the StackViewer.
- point - leave a point marker/pin. Points appear in your Personal Color.
- rectangle - draw a rectangular annotation.
- polygon - draw a polygonal annotation.
- clipboard - Copy the current view in the StackViewer to your clipboard. If annotations are visible, they will be included. Hold option/alt to save the current view as a file on disk when you click - the icon will change to a disk to indicate this.
- delete - delete an annotation by clicking on it. (There is currently no undo.)
- color picker - pick what colour your annotation will be. You can choose from a list of ten pre-set colours. This colours can be given names via the Stack Manager, which enables them to be used for categorisation/classification. If an annotation - point, rectangle, or polygon - is selected, the color picker will update to reflect its color. If the color picker is changed when an annotation is selected, it will update the color picker of the selected annotation.
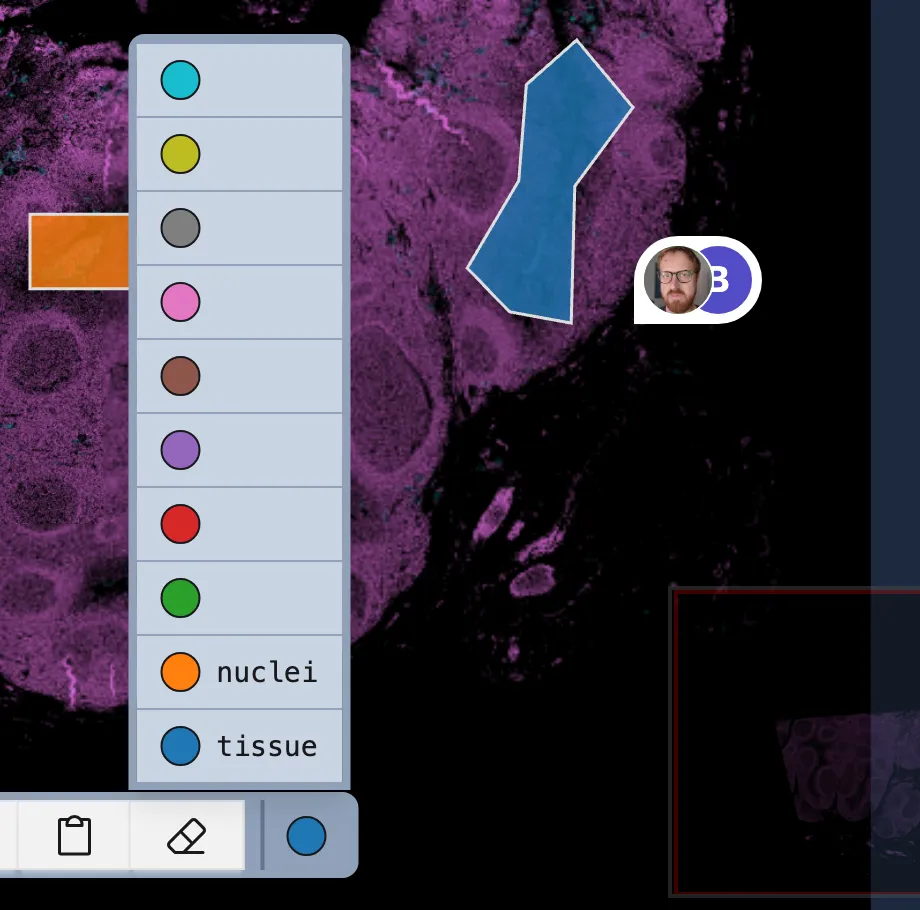
Here, we can see the color picker expanded. Two of the colors have been given labels in the Stack Manager - these will be included in any data export.
7. Layers
Section titled “7. Layers”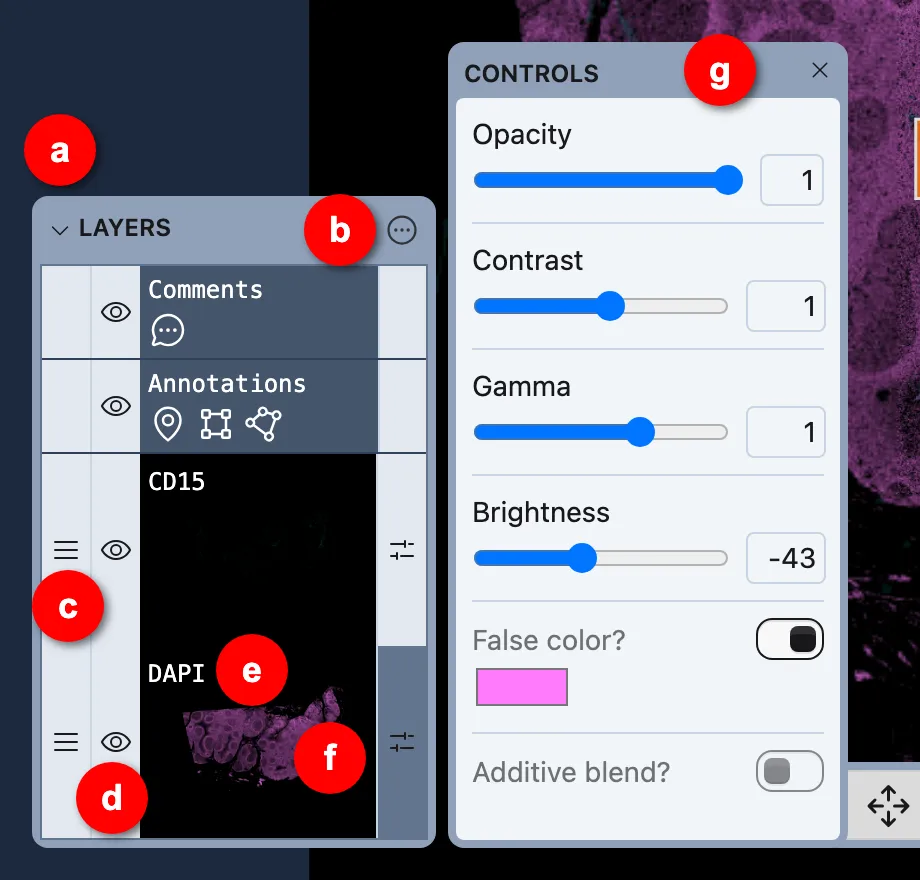
All layers are shown in the palette. By default, the panel is closed; click the caret/arrow (a) or word ‘layers’ to toggle the Layers panel. Click the “more” icon (b) to reveal the “bulk actions menu” (see below).
Scroll the panel with two-finger-scroll/scrollwheel to reveal more layers.
On each layer:
- grab the drag handle (c) to reorder the layers. Note that you cannot re-order annotations; they always appear on top.
- click the eye (d) to toggle the visibility of a layer.
CommandCommandControlCtrl -click a layer to toggle the visibility of all other layers - ie, make the current layer the only visible one. (CommandCommandControlCtrl -click again to set other layers back to visible). Note that while you can toggle the visibility of annotations, this change is not shared with other users. - click the layer name (e) to edit the name of the layer. (This is initially derived from the upload naame)
- click the fader icon (f) to bring up the layer control panel (g)
Layer controls
Section titled “Layer controls”The layer control panel (f) lets you perform basic, non-destructive alteration to a Stack Layer:
- Opacity - transparency of this layer, where 0 is completely transparent and 1.0 (default) is opaque
- Contrast - adjust the difference between light/dark of a layer.
- Gamma - adjust the gamma curve of a layer: this alters contrast only in midtones. Contrast is more pronounced as gamma gets closer to zero (smaller).
- Brightness - boost/attenuate the level of every pixel. You probably don’t want this.
- False color - enable to false-color a layer. Click the color box that appears to pick a color. Only recommended with monochrome layers: it essentially turns a layer that is (black-to-white) to (black-to-
color) - Additive blend - turning this on will make black areas in the layer transparent (more accurately: all pixels will becoming transparent based on their relative brightness). Useful for turning a layer into an overlay, and particularly when combined with false-color.
Double click any slider to return it to its defaults.
Bulk layer actions
Section titled “Bulk layer actions”Clicking the ‘more’ icon (b) will spring out a dropdown menu with actions that can be applied to all layers:
- Enable/disable additive blend for all layers will toggle the additive blend mode for every layer in the stack. This is useful if you have many layers in a stack and wish to make them all blend (eg, viewing different channels atop a stain).
- Pick different false color for each layer will give each layer a distinct false color (picked from a palette of 12 items. If you have more than 12 layers, the color picks will repeat). In addition, if false color is not switched on for each layer, this will switch false color on for every layer.
- Enable/disable false color for all layers will toggle the false color setting on or off for all layers in the stack; it will not affect the specific colors of those layers.
8. The Annotation Inspector
Section titled “8. The Annotation Inspector”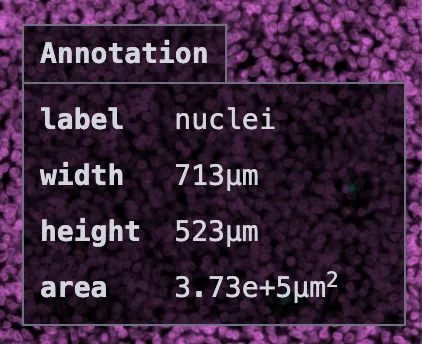
Clicking on an annotation polygon will bring up the Annotation Inspector in the bottom right. It will show:
- the label associated with the annotation’s color, if it has once
- for rectangle annotations, its width and height
- for rectangle/polygon annotations, its area
Dimensions are all displayed in mm/µm for Stacks with scales. If your Stack has no scale, dimensions will be displayed in px.
Keyboard shortcuts
Section titled “Keyboard shortcuts”There are a number of keyboard shortcuts in the layer viewer, most notably for zooming the image and for picking tools. Press
They can also be seen in the Stackviewer Keyboard Shortcuts reference.